Recreating Rock Band Drums
redshift· November 19, 2024· [games-and-hobbies, reviews]Background


Back in 2007–2009, I had a lot of fun playing drums with Rock Band. It was well constructed as a game, just physical enough to not feel like a game, just accurate enough to feel realistic, and just social enough to play comfortably at parties. I can't remember whether it was Rock Band 1 or 2, but they were fairly similar; Rock Band 3 changed things with "Pro" controller support, but I couldn't afford it at the time.
I had played Guitar Hero before, but that felt more like a game. The guitar controllers were not very realistic, and it's hard to claim it was exercise or musical instruction. (I tried real guitar afterward and discovered it wasn't for me.) Drums were the real revolution.
I moved a couple years later, and I got rid of the Rock Band drum kit because I was going to a small apartment. (Please don't drum in an apartment without great care and expense around sound dampening.) Now I have some more space, and I wanted to have that fun again.
It took me a few months to research, assemble, and tune everything for accuracy, so I wanted to share what I've learned and make it easier for others.
If you fondly remember Rock Band drums, or if playing drums sounds fun, read on!
Options
If you still have Rock Band and its drum kit, you can still play it, of course. And if you have Rock Band 3 or 4, apparently you can use any (MIDI-compatible) electronic drum kit, though I can't speak to that. The career modes were great fun, and the graphical effects were immersive. You'll have a hard time getting more or newer music, though.
Let's talk about playing on a computer so we have more control. The first decision is hardware.
Hardware options
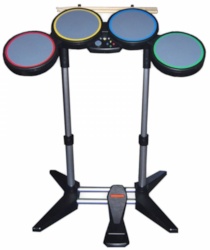
You can still get (used) Rock Band drums, but who knows what shape they're in after being played and stored for 15 years. They might be the cheapest option, though.
Another cheap option would be an electronic drum pad—they're basically rubber mats with ≈7 pads to hit and a couple of foot switches. It won't feel anything like real drums, and you have small targets to hit with your drumsticks, but you can get decent ones around $60 and they have the MIDI support needed for gaming.
Next up would be a real electronic drum kit. You can get decent used ones for $100–$200. I'd advise caution, because drum kits (by definition) get banged on a lot more than other used goods. If you can afford it, it's worth looking at a new set instead.
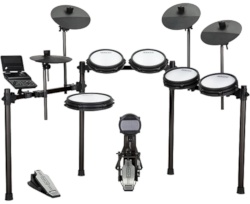
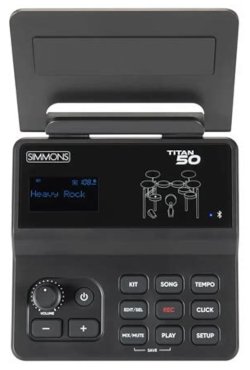
Worthwhile new kits start around $300 for something like an Alesis Mesh. I did a bunch of research and went with the Simmons Titan 50 B-EX (B for black, EX for expanded) because it had an extra pad and cymbal, and it's sturdier, for $400.
(Extra pads help when navigating through menus. Without them, you'll be moving back and forth between your drum kit and your computer after every song, or you'll need an extended keyboard and mouse, or a setup for a nearby laptop.)
You can spend a lot more if you want—Roland is reliable, but you pay more than double for the same features, for example. If you're stepping up from Rock Band, or haven't played before, it's probably best to start cheaper and then find what bothers you and needs to be replaced. Speaking of that...
Mini-review of the Titan 50 drum kit
Note: I don't have experience with different kits other than through online research, and I'm a new drummer. This is mainly a discussion of the Titan 50 for the purposes of Rock Band recreation. (That means I'm not going to be talking much about the quality of the drum module ("brain") because I mostly care about its MIDI output capability, which is fine.)
It's good! It was easy to set up; the rack comes preassembled, unlike with most other brands. I haven't had any issues with reliability so far; I've been banging on it for about 2.5 months and it looks and acts new. I haven't had any compatibility issues; it worked with Linux with no configuration, and all the games and MIDI monitors I tried saw it immediately. The mesh pads feel nice to hit and have a good rebound.
Those are the most important points, so I'd recommend it overall.
Here are my nitpicks:
- The kick drum makes a clanking sound. (Keep reading for why I want to replace it anyway.)
- As with almost all e-kits, the cymbals are rubber, and they don't have much bounce.
- The hi-hat pedal is a bit mushy and doesn't activate right away. (But you don't use this for Rock Band.)
- The module doesn't save some settings, like the auto-power-off, which I always want on.
- It seems the firmware is no longer being updated.
- It's barely tall enough; I'm 6′3″, and I raised the rack arms as much as they'll go, and I still have to slouch a bit.
Sound dampening
This is related to hardware, and you have to be prepared for some extra expense. If you live with anyone or have neighbors anywhere near, you need to try your best to dampen the sound of playing your drums.
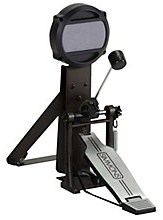
Electronic drum kits are already dampened almost as much as they can be (with one exception) so this section is mainly about dampening the room. You want as much sound absorbed as possible—before it goes through the walls and floor. The floor is where that one pesky exception comes in. Electronic drum kits mostly still come with real kick pedals that slam into a small mesh or rubber pad on a little tower. That impact pushes down into the floor toward anyone below you. If you're not on the ground floor, that's a problem.
Kick pedal sound
My first attempt at taming the kick pedal was getting the thickest, heaviest drum mat I could find. (A drum mat is a rug meant to fit under a drum kit that stops the parts from sliding around and dampens sound somewhat.) I'm not sure I'd recommend what I got, even though it helped somewhat, because it was overpriced. If you want a drum mat, just get one that fits your space and understand that it won't solve the noise problem.
A step or two up from a drum mat is a drum isolation platform, which is a more serious affair. Think of two sheets of plywood with extreme cushioning between them—it's meant to completely separate you from the floor. Some people make them at home with tennis balls between the layers. It'll raise you up and compromise your stability slightly, but it'll definitely reduce the sound traveling through the floor. (You'll probably still want a drum mat to put on top of it.)
Realistically, though, if you need to be quiet, the best answer I've found is a beaterless kick pedal. They don't have a swinging arm bashing into a pad—just a trigger switch activated by moving your foot. Roland is the only big company making these now, which means they're expensive. The KT-9 is silent, for about $200. The KT-10 is not quite silent, but feels more realistic and is trivial to connect to another KT-10 for double bass... but it's $300. I'm hoping for a sale on these before I jump in.
For completeness, I also want to point out the Krigg. You take an existing kick pedal, remove the beater, and attach the Krigg. No need for the kick drum tower after that, just the pedal. It triggers when you step. It seems like it would feel similar to the Roland KT-9. I'm hesitant to consider it because I'd want a better pedal to attach it to (expensive), and the Krigg is expensive, and shipping is expensive, and some listings on their site are broken, like the link for the YM cable you need to use two Kriggs and two pedals.
Absorbing other sounds
For absorbing the sound in the air (from pads and cymbals) you want soft, dense materials in the room. This can be anything—if you already have carpet, thick curtains, soft couches, etc. then you're halfway there.
You'll probably have flat walls somewhere around the kit. These are escape paths for the sound, and they echo some of it back at your other walls, too. You want to cover these somehow.
I tried a bunch of products and found that standard foam was the least effective. Egg crate foam, specially shaped foam, it didn't matter. It was low density and therefore ineffective.
There is high-density foam that does a better job, but it was beyond my budget.
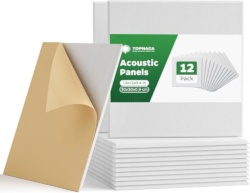
High-density fiber seems to be cheaper and does a good job. I got big panels to hang on doors (sadly no longer available) and small panels to attach to walls. I'd definitely recommend the small panels. They're easy to attach (even to textured walls) without feeling permanent, and they're easy to cut to fit into smaller spaces.
I don't have a scientific testing method, but I found a fun and effective way to do it. I talk at the wall from just a few inches away, then move different acoustic treatments in front of my face, sliding them along the wall. The echo tells you a lot. The foam didn't do much; the fiber panels did a lot.
You don't have to completely cover the walls. I would recommend completely covering doors, if possible, but for walls you can put up panels in attractive patterns and stop when the dampening effect is good enough. Two packs of the panels will make a huge difference.
Software options

Ok, now you can play drums and not bother people too much. Let's get to gaming. You need some software that acts like Rock Band.
Clone Hero has been around for years. It basically created this space, so I'm quite thankful. However, it wasn't originally built for drums, configuration was difficult, and development has slowed, so I think other options have overtaken it.
I'd recommend YARG. It's a smoother experience and plays beautifully. The documentation is still a bit lacking (I'm hoping to help with that here) and it's not as flashy, but development is moving quickly.
To install YARG, you probably want to use their launcher. They include some free music, and you can get your favorites in ways I won't describe here.
Hardware setup
Ok. Part 2. You've decided on hardware and software—let's get it set up.
Physical setup
Follow the instructions that came with your kit, but there's one key thing they don't talk about. Don't overtighten anything. When you're attaching arms, cymbals, pads, anything—only tighten the attachment points as much as you need to keep them in place while you're playing. The tighter they are, the more vibration is transmitted to other parts of the kit. That will cause phantom drum hits, which you'll have to compensate for in the kit settings, and that compensation will mean it will miss some of your hits. It's a big circular mess that took me a long time to figure out. So don't overtighten.
Beyond that, just be ready to adjust the components of your kit as you figure out what's comfortable for you. For a while, I was making adjustments after every song. If you close your eyes and aim for a drum, that's probably where it should be.
Drum kit settings
Each electronic drum kit has a module ("brain") with settings to control how you can hit the pads. We're not so much concerned with the sound output for rhythm games, just the settings that compensate for double hits, interference, etc.
Each brand has different names for these settings, but on Simmons, they are:
- Sensitivity: how hard you have to hit a pad to get the maximum volume.
- Retrigger: how quickly you can play on a pad; if this is wrong, it could miss notes when you play quickly, or the opposite, register extra notes because of subtle unintentional bounces.
- Threshold: how softly you can play; in other words, the minimum force for a note to trigger.
- X-Talk (Crosstalk): how much the kit will try to ignore hits that it thinks are really just vibration from hitting another pad.
Settings adjustment process
Here's how I would recommend getting that all set up correctly.
Hook your drum kit to your computer via USB, and run a MIDI monitor program. (I use Drumstick but there are several free options.) This will let you see what your drum kit thinks you hit. If you don't use a MIDI monitor, you're going to have a hard time figuring out your issues.
Set up the sensitivity first. Hit a pad and see what number shows up in the MIDI monitor, from 1 to 255. Hit the pad as hard as you think you'll want to when playing, and adjust the sensitivity until you're getting around 250 with that type of hit. Repeat for each pad, cymbal, and pedal.
My snare is 15, toms are 11, cymbals are 15, and kick is 15, and the maximum is 32.
- Next, set up the threshold. Hit a pad as softly as you think you'll want to when playing, and adjust the threshold until you consistently see those hits in the MIDI monitor, but you don't see softer hits. This is important so you don't get accidental hits from light touches when you're moving your sticks, or from vibrations from hitting other pads.
My snare and toms are 25-30, cymbals are around 15, and kick is 20, and the maximum is 50.
- Next, set up retrigger. Hit a pad as quickly as you think you'll need to when you're playing, and make sure all the hits are registered in the MIDI monitor. (Maybe do a sequence of 8 hits and count the results in the MIDI monitor.) Adjust the retrigger until it picks up all the hits, but not if you play faster. (For rhythm games, you don't care about buzz rolls.)
I found retrigger to be especially important to tune for the kick pedal. I tended to get a lot of extra bass hits because the beater would lightly tap the pad after my hits. Later, I got better at releasing my foot after a hit, but even so, you won't need to hit the bass drum as quickly as other pads, so retrigger can be more strict.
Note: Simmons has a misprint in the manual of the Titan 50. You turn retrigger up if need to be able to play faster, but the manual says down.
My snare and toms are 4, cymbals are 3, and kick is 2, and the maximum is 8.
- Finally, set up crosstalk. This is how the kit compensates for the vibrations from hitting one pad setting off other pads. Hopefully you won't have too many issues here, if you followed my earlier advice: don't overtighten your kit.
Start the crosstalk setting at the minimum level for each pad. Hit each pad hard and watch the MIDI monitor to see if any other pads registered. If so, turn up the crosstalk setting on the pad that you didn't hit but was set off anyway. Raise it one point at a time until the problem goes away. If you raise it too much, the kit will start dropping your real inputs.
Sadly, that's not enough, because you'll frequently hit multiple pads/cymbals at once in a song, and that causes different vibrations in the kit. Watch your MIDI monitor and hit two things at once, and maybe add your kick drum. Hit your snare and crash cymbal, or your hi-hat and a tom—try different things. Watch for phantom hits, and turn up the crosstalk for any pad you didn't hit but that registered anyway.
My crosstalk only has to be 1 on everything, once I learned not to overtighten the kit. (The maximum is 75, which I can't imagine needing. It would almost certainly drop real hits at that level.)
Software setup
YARG is pretty configurable, but the documentation is incomplete. In particular, the settings related to fixing timing issues are barely described. There are brief descriptions in-game, but they don't discuss the units or how to figure out the best values. The game has a tool for setting audio lag, but not video or instrument lag, and I've found the audio lag tool to be pretty far off.
Here are the parts you really need to know.
First, you need to understand the graphical elements of the game, so you know what to adjust:
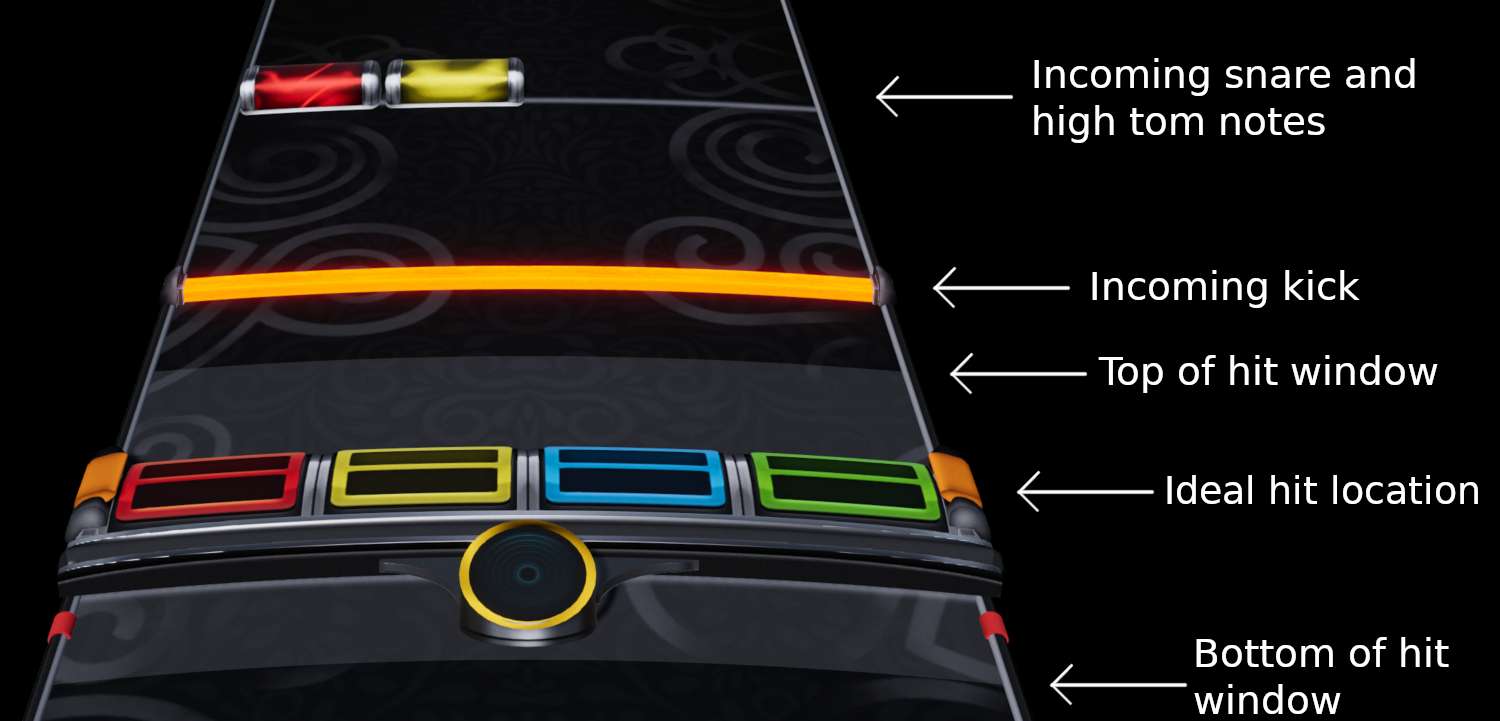
The most important thing is the hit window, which is the thick band that's a lighter color near the bottom of the track, surrounding the target bar (the "ideal hit location"). As long as you hit a note when it's in the hit window, you get credit. So, software setup is all about making sure that the notes and the window are where they should be.
When you hear a note in the song, you want the visual representation of that note (for example, a red rectangle for the snare drum) to be right at the bar where you see the red, yellow, blue, and green rectangles—the target bar. That's the ideal hit location. If they don't line up, you'll always feel like you have to play early or late to get credit.
And the hit window is there to make sure you have time to hit the note at that target bar—you're not a robot.
Available timing adjustments
The game gives you a few ways to adjust these factors:
- You can move the notes up or down to compensate for audio lag.
- You can move the window up or down to compensate for video lag and instrument lag.
- You can make the window bigger (or smaller) to compensate for combinations of issues, or just to adjust the difficulty.
I'll describe the specific levers the game gives you to adjust the notes and the window, and in the next section, I'll give recommendations about how to do it.
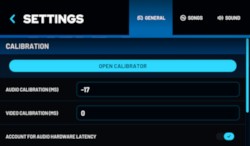
- In General Settings, there's audio calibration: this moves the notes up or down. Positive values move notes upward. It's measured in milliseconds, so try changes of 2-3 for small issues or 10-20 for large issues. Mine is set to 5. (This setting is what the automatic audio calibration changes, but I found that it made much too large a change.)
- In General Settings, there's video calibration: this moves the notes and the window up or down. Positive values move them downward. Also measured in milliseconds. Mine is set to 22.
- In your Profile, there's input calibration: this moves the window up or down. Positive values move the window downward. Also measured in milliseconds. Mine is set to -20.
A couple of settings are a bit more hidden, but this is important. Go to Settings and then Presets, change Preset Type to Engine Presets, copy a preset (perhaps Casual to get started), and rename the copy to something you'll remember. Now that you have a custom preset, you can change the settings for it below; just change Game Mode to Drums.
- Dynamic Hit Window makes the timing requirements more exact when you're playing faster notes; turn this on if you want more challenge. I currently have this off.
- Hit Window determines the vertical size of the hit window on the track. The bigger it is, the more time you have to hit notes. It can make up for difficulties in getting all this timing stuff just right, so don't be afraid to increase it—you still have to hit the right drums, after all. In the screenshot above, it's set to 195 milliseconds, up from the default of 140 milliseconds.
- Hit Window Ratio lets you move the window up or down, just like the input calibration setting. It's not measured in milliseconds, though, just a number between 0 and 2, where higher numbers move the window upward. I keep mine at 1.0, so the hit window starts centered on the target bar, and I use the other settings to move it. You probably don't need to use both input calibration and hit window ratio; use input calibration if you want different values for different profiles (perhaps for different instruments) and use hit window ratio if you want to be able to share the window placement across different profiles by using the same engine preset.
Now go back out to your Profile and set your Engine Preset to the one you just created, so those changes will take effect.
Some other related features:
- In General Settings, "account for audio hardware latency" is a toggle that acts like a positive value for video calibration, but it doesn't say how much; I'd recommend leaving this off so you have more control.
- In Graphics Settings, just lower the quality until you can maintain 60+ FPS. I'd recommend leaving "show FPS counter" on so you can tell if it ever drops.
- In Profile, you want Standard Drums, not 5-lane, if you're using a real electronic drum kit. 5-lane is for Rock Band kits.
- In Profile, you can raise Note Speed to make the notes move faster downward on the track; this can be helpful for understanding fast notes on some songs. If it's too low, the notes will bunch together and be indistinguishable. I use 5.5.
- In Profile, you can raise Track Length to make the track use more of the vertical space on your monitor, and therefore show more upcoming notes. This sounds great, but it can be a bit overwhelming. I use 1.8.
Timing adjustment process
I know that last section might seem like a lot, but there are really just two things to get right—the notes and the hit window. I'll try to make that as easy as possible.
Adjust your drums on their own, first, without YARG—see the Drum Kit Settings section above.
Make sure you've made your own copy of an engine preset, as described above in available timing adjustments.
Adjust audio calibration in YARG's General settings. If what you hear doesn't line up with what you see, the rest is pointless.
Start any song in YARG, listen for the beat, and watch whether the notes hit the target bar when you hear them in the song. If you hear the beat and the note still hasn't hit the bar (meaning the colored rectangle is above the bar) then turn the audio calibration setting down, which will move the notes downward. On the other hand, if the notes have already passed the bar when you hear them in the song, turn audio calibration up, which will move the notes upward. How much to adjust it depends on how far apart the visuals and audio are; try adjusting by 2-3 for small issues or 10-20 for large issues.
It may help to adjust the song speed to a lower value, maybe 50% instead of 100%, so you can focus on individual notes hitting the target bar. You'll need to play with this setting a bit until it feels right, and you'll probably continue to make small adjustments for a while—that's fine. Your final value will probably be between -50 and 50; any further would likely represent an issue with your hardware.
- Adjust input calibration in your YARG profile. You may think that if the audio is now lined up with the video, you're done, but you may still need to adjust the input window up or down. All inputs have lag, and your drums are no different. If it takes YARG 50 milliseconds to receive your drum hits (it shouldn't!) then even if you hit the drum exactly when the audio and the note and the target bar line up, it will be 50 milliseconds before it registers, and the note will have continued moving down in that time, and it may no longer be inside the target window, therefore it'll count as a miss.
So, to adjust this one, you'll need to play some drums. Find a basic song—maybe start a few and find one that just has some basic snare hits, probably on Easy difficulty. Maybe slow it down from 100% to 50%–70%. Hit the notes as best you can, and try to watch the screen to see when the hits register. You'll see that the colored rectangle representing a note will depress and darken when the hit registers. It'll be a short time after you actually hit the drum—hopefully a very short time—with the exact timing depending on your drum kit and computer.
If the hits tend to register above the target bar, then you want to move the target window up by decreasing the input calibration value. If the hits tend to register below the target bar, then you want to move the target window down by increasing the input calibration value. Similar to audio calibration, try adjusting by 2-3 for small issues or 10-20 for large issues. And similar to audio calibration, you'll need to play with this setting for a bit to get it just right.
- Optionally, adjust video calibration in YARG's General settings. This moves the notes and the target window, so you don't really need to change it at all—you can just use audio calibration and input calibration. You could use this setting if moving the notes and target window together help you to make sense of the issues. If you know your monitor's display lag, you could set video calibration to match, and adjust the other values with that as a starting point, for example.
Personally, once I learned how all these values work (by writing this!) I set video calibration back to 0. I now use audio calibration -17 and input calibration +2, which gives the same total result as audio calibration +5, video calibration +22, and input calibration -20.
Result
Now that I've finished calibrating everything, almost every miss or overhit in a song is my fault. That's a great feeling! When I started, I would have hundreds of misses and overhits each song, most of them not my fault. It was quite frustrating.
The biggest single improvement was not overtightening my kit, but deciphering the real meanings of the YARG settings let me finish the job.
I hope this post helps you skip most of that and get to the fun part.
YARG is a great motivator for learning drums. It keeps track of your score based on how many notes you hit on time, so when you do better, you get a high score. You know for sure you're improving. And when you're doing really well on a song, you can try the next difficulty level. It takes serious skill to play songs on Expert.
It scales further than Rock Band 1 or 2 now that there are more realistic cymbals, and it scales further than any Rock Band now that there's a dedicated community of people making tracks that allow you to play your favorite songs.
I'd still recommend online lessons to learn proper technique so you don't hit a wall with your progress. I use Drumeo and I've been happy with it; it's not perfect, but it's done more for me than "real" lessons did years ago. Let me know if you want 30 days free instead of the default 7. (You can easily guess an email address that would reach me, or you could use Mastodon.)